This campaign (previously Lead Gen) makes it easy to boost engagement on your website. With this tool, you can create custom forms and call-to-action prompts that target specific segments, on designated pages of your site. Use it to boost newsletter subscriptions, promote events, direct users to new articles, and more! Live Engagement is an evolution from the previously known “Lead Gen” campaign. Live engagement campaign allows you to create lead gen forms OR call to action prompts. When creating or updating a campaign, there is a new toggle for “Lead Gen Form” or “Call to Action” at the top right that allows you to choose your workflow. The editor will update with the available fields per workflow 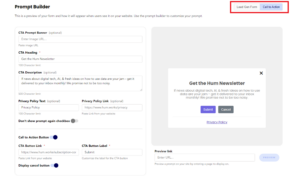
🧱Step by Step Setup Guide
* = Required Fields
Step 1: Campaign Info
In this step you are inputting some of the base information about the campaign including
- Name *
- Code * – The campaign code is used as the form id. It must be unique and cannot contain spaces
- Target Segment – optional
- Description – optional
With Target segment – you can specify specific audience segments that you want to display this campaign to as a way of personalizing user’s experiences.
Step 2: Display Rules
- Display Frequency *
- Start & End Dates *
- Delay
Step 3: Prompt Builder
In this step, you build the prompt that you want to display to users.
You can customize the following:
- NEW: Body Content (Previously: Banner, Title, Description)
- NEW: Footer Content (Previously: Privacy Policy)
- “Do not show modal again” and message
- “Do not display on mobile” toggle
- Form Fields
-
- Toggle which fields you want to prompt users for
-
- You can also require specific fields
-
- If you do not want to use this as a lead gen campaign, you do not have to display and form fields.
-
- Submission button label
- Display Cancel Button
As you update the information, the preview on the right will live update with your changes & you can use the Preview Link at the top of the preview to preview the prompt on your site.
Step 4: Active Pages
In this step, you can specify which pages on your website you want to display this campaign. This is a way of personalizing the campaign to your user’s interests. For example, you can specify that you want to display this campaign on all blog posts about digital-transformation.
To add active pages you need to following information:
- Match Type: This allows you to select multiple webpages simultaneously instead of manually adding individual ones. Example: “Contains /blog/”
- Pattern: This can be a full or partial website URL
NEW: CSS Selector option & Bulk Upload Pages
You can now set active pages by CSS selector. If the CSS selector you provide is found on the page, we will activate your campaign.
You can also upload multiple active/excluded pages at a time with bulk upload
And click on add pages! There is no limit to how many active pages you have and this step is completely optional if you want the campaign to display on all pages of your website. You also have a table for Excluded Pages. Use this table to exclude certain pages from the campaign.
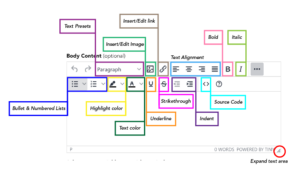
New: WYSIWYG Editors

In the Prompt Builder, you can customize the Body Content & Footer Content with WYSIWYG editors. This enables advanced formatting options and image upload.
For existing campaigns: the previous fields have been translated into the new WYSIWYG editors
- Banner Image
- Banner Image Alt Text
- Prompt Heading
- Prompt Description
- Privacy Policy
WYSIWYG Editor Capabilities
FAQ
Q: What time does the campaign start and end?
A: The campaign start and end times are at midnight UTC. If you set a campaign to start on Jan 5. It will start at Jan 5 @ Midnight UTC
Q: What dimensions should my images be?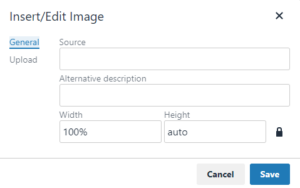
A: If you want your images to adjust to be the full width of the prompt: Set the dimensions to width: 100%, height: auto
The following are suggestions, but we highly recommend testing different image dimensions via the preview link.
-
- Pop-up modals: 500px width (the set width of the modal)
- Slide-in boxes: 350px width (the set width of the container)
- Banner: 1080px width
Q: What file types are accepted for images?
A: gif, png, jpg, jpeg, webp
Q: What is the file size limit for images?
A: 1 MB
Q: Does the WYSIWYG Editor work on previously built campaigns?
A: Yes, Campaigns created prior to this feature work with the WYSIWYG editor.
Q: Can I add custom code to the WYSIWYG editor?
A: Yes, you can use the source code button to see the HTML where you can also add your own.
Q: Is there a character or word limit for the WYSIWYG Editors?
A: No
Q: Can more than 1 Hum prompt display on a page at once?
A: No. You may be running a campaign with an inline prompt & another campaign with a popup modal prompt. Only 1 of those prompts will render on the page.
Q: How can I track clicks for links in prompts?
A: You can track links by adding UTM parameters to links. Check out our help doc on setting up utm links for live engagement campaigns.