 The institution name variable is a new feature for Live Engagement Campaign that allows you to create 1 campaign that targets multiple institutions instead of making many copies of the same campaign per institution.
Requirements:
The target segment must target profiles a part of an organization.
Use cases:
- Target all read and publish customers
- Target profiles apart of organizations that aren’t paying and are being turned away by paywalls
How to use the institution name variable:
In the Heading or Description fields, use %%primary_institution_name%% where you want the institution name to display.
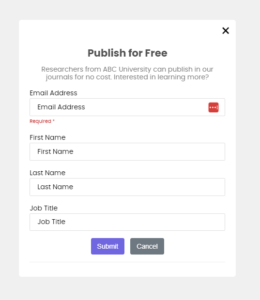
Example:
Publish for Free: Researchers from
%%primary_institution_name%%can publish in our journals for no cost. Interested in learning more?
How to test/confirm institution-name variable populates correctly in a Live Engagement Campaign
- Create a test Live Engagement campaign
- Choose the same touchpoint type you will use in production (for example, modal prompt).
- Insert the institution variable into the copy where you want it to appear (%%primary_institution_name%%)
.
- Prepare and upload your test org file
- Use the org-info template in the platform: Settings > Data Upload > Organization Information.
- Populate the template columns as follows:
- Organization name (column A): This is what will appear in the modal. It can be made up, but it must be unique for each row.
- IP ranges: The public IP you are testing from (e.g. the IP for your computer if you are the one doing the testing). This must be unique for each row.
- Location: Can be made up; must be unique for each row.
- Industry: Can be made up; can be unique for each row.
- Number of employees: Can be made up; can be unique for each row.
- Customer type: Can be made up; should be the same for all rows.
- External ID: Must be unique for each row (example: myname123456789).
- Source system: Can be made up; should be the same for all rows.
- SIC code: Can be made up; should be the same for all rows.
- Save the file as CSV and upload it to your instance.
- Build the audience segment
-
- Create a new segment that filters on IP-inferred Primary Institution.
- Set the filter to the organization name you uploaded (column A) so the segment only includes users inferred from that IP/institution.
-
- Attach the segment to your test campaign and activate it
- In the campaign audience step, select the segment you just created.
- Activate the campaign.
- Wait about 10 minutes for the system to process the segment and campaign activation
- Validate the experience from the test IP
- From the computer associated with the IP you uploaded, open a fresh incognito/private browser window and browse a page that would trigger the Live Engagement touchpoint.
- Confirm the modal or prompt appears with the institution name (column A) populated in place of the variable.
How to verify success
- The campaign seen in incognito should display the institution name exactly as entered.
- Note: preview links in the admin UI often show the instance default name (for example Hum) and will not reliably show IP inferred institution values. Use an incognito browser from the test IP rather than relying on the preview tool.